Imagine a dessert that’s at once elegant, impressive, and surprisingly simple to create. That’s precisely what you get with Easy Cream Puffs: Instant Vanilla Pudding Filling Recipe. These delectable treats, featuring a light-as-air pastry shell cradling a rich, creamy vanilla filling, evoke the charm of a French patisserie without requiring a pastry chef's diploma. Our focus today is on making these irresistible bites accessible to every home baker, transforming a classic into a quick, fuss-free delight by harnessing the power of instant pudding.
Cream puffs, known as profiteroles in France, are a testament to the magic of choux pastry – a dough that seems intimidating but is remarkably straightforward. The true genius of this recipe, however, lies in its filling: a luscious, decadent vanilla cream crafted from instant pudding mix. This simple swap eliminates hours of custard-making, allowing you to whip up a batch of bakery-worthy cream puffs in a fraction of the time. Perfect for last-minute gatherings, a special family dessert, or simply satisfying a sweet craving, these Homemade Vanilla Cream Puffs: Bakery Taste Made Simple are destined to become a beloved staple in your culinary repertoire.
Mastering the Magic of Choux Pastry: Your Light-as-Air Shells
At the heart of every great cream puff is the perfect choux pastry. This isn't your typical flaky pie crust or chewy cookie dough. Choux pastry (pronounced "shoo") is unique because it's cooked twice: once on the stovetop and then again in the oven. This double-cooking process is what creates those signature hollow centers, ideal for filling with creamy goodness.
The Stovetop Stage: Building the Foundation
The journey begins in a saucepan, where you'll combine water, butter (or margarine), and a pinch of salt. Bring this mixture to a rolling boil. The butter needs to be fully melted and integrated before the next crucial step. Once boiling, remove the saucepan from the heat and vigorously stir in all-purpose flour. It might seem like a lot of flour for the liquid, but this is intentional. Stir continuously until the mixture comes together to form a cohesive ball of dough that pulls away from the sides of the pan. Continue to cook this dough ball over low heat for another minute or two, stirring constantly. This step, often called "drying out the dough," is vital for evaporating excess moisture, which helps create a crispier shell and allows the dough to absorb more egg later on.
The Egg Incorporation: Achieving the Right Consistency
Once the dough has formed a ball and dried out slightly, transfer it to a large mixing bowl (or the bowl of a stand mixer). Let it cool for about 5-10 minutes. This cooling period is important because if the dough is too hot, it will scramble the eggs. Now comes the egg-beating stage. Add your eggs one at a time, beating thoroughly after each addition until the egg is fully incorporated and the dough is smooth before adding the next. The dough will look lumpy and separated initially, but keep beating, and it will come together beautifully. The final dough should be shiny, thick, and fall slowly from a spoon in a 'V' shape – often referred to as a "bird's beak" consistency.
Baking to Golden Perfection: The Oven's Role
Preheat your oven to a relatively high temperature, typically 450°F (230°C). This initial high heat creates a burst of steam that causes the pastry to puff up rapidly. Line a baking sheet with parchment paper to prevent sticking. Using a spoon or a piping bag, drop small mounds of dough onto the prepared baking sheet, leaving ample space between them as they will expand significantly. For uniform puffs, a piping bag with a round tip works wonders, but a simple spoon is perfectly effective. Bake at the high temperature for about 15 minutes, until the puffs have risen and started to turn golden. Then, here's a crucial tip: reduce the oven temperature to 325°F (160°C) and continue baking for another 20-25 minutes. Do NOT open the oven door during this entire baking process! Opening the door releases the steam that keeps the puffs inflated, causing them to collapse. The lower temperature allows the puffs to dry out and crisp up without burning, preventing them from deflating once cooled. You'll know they're done when they're a deep golden brown and feel light and hollow when lifted.
Once baked, immediately remove the puffs from the oven. For extra insurance against sogginess, some bakers even poke a small hole in the side of each puff to release steam, though this is often unnecessary if they are baked thoroughly. Transfer them to a wire rack to cool completely before filling. Rushing this step will result in soggy bottoms.
The Decadent Heart: Quick Cream Puffs with Vanilla Pudding Filling
While the choux pastry provides the airy foundation, it's the rich and creamy filling that truly defines these quick cream puffs with vanilla pudding. And thanks to instant pudding mix, achieving that luxurious texture and flavor is astonishingly simple.
The Instant Pudding Advantage
Gone are the days of tempering egg yolks and constantly stirring a hot custard. Instant vanilla pudding mix is a game-changer, delivering that classic, comforting vanilla flavor and silky-smooth consistency with minimal effort. The beauty of it lies in its adaptability, allowing you to create a filling that perfectly suits your taste and texture preferences.
Crafting Your Creamy Filling
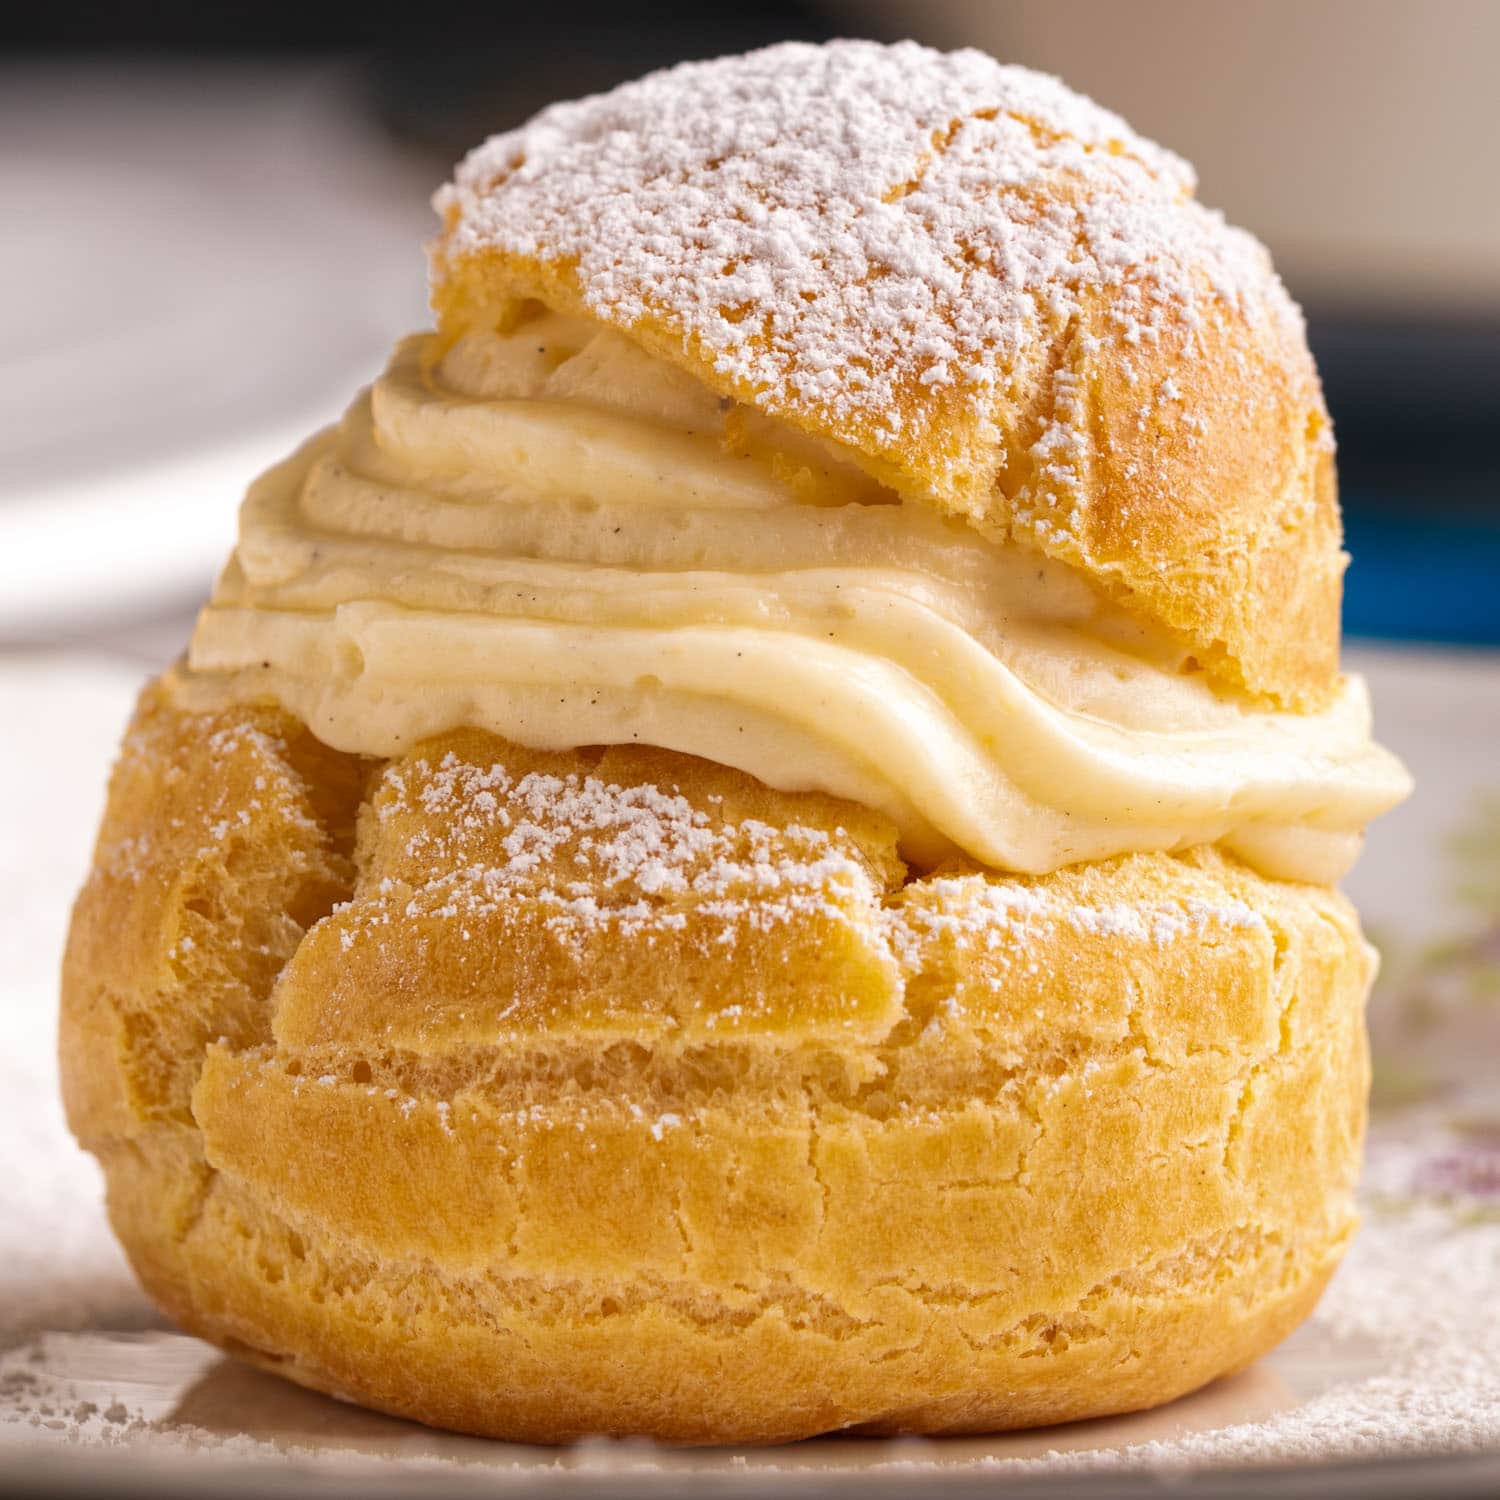
For a truly decadent filling that rivals bakery versions, we recommend a combination of instant vanilla pudding mix, cold milk, and heavy cream. Whisk together the instant pudding mix with the specified amount of cold milk in a large bowl. Beat it vigorously for about 2 minutes until the mixture begins to thicken. In a separate bowl, whip heavy cream until it forms soft peaks. Gently fold the whipped cream into the prepared pudding. This combination creates an incredibly rich, airy, and stable filling that holds its shape beautifully within the cream puffs. Allow the mixture to chill in the refrigerator for at least 30 minutes (or longer) to set fully and intensify the flavor.
Pro Tip: For an even more pronounced vanilla flavor, add a teaspoon of pure vanilla extract to the pudding mix along with the milk. If you prefer a lighter, even quicker option, some recipes suggest blending instant pudding mix with milk and a container of thawed Cool Whip. This yields a fluffier, less dense filling that's still delicious and incredibly fast to prepare.
Flavor Variations and Enhancements
While classic vanilla pudding is undeniably delicious, feel free to experiment! Chocolate, banana, butterscotch, or even pistachio instant pudding mixes can transform your cream puffs into exciting new creations. You can also fold in finely chopped fruit, a sprinkle of mini chocolate chips, or a dash of liqueur (like a coffee or hazelnut liqueur) to the finished vanilla pudding mixture for an extra layer of complexity. Just ensure any additions don't thin out the pudding too much.
Assembling Your Masterpiece and Serving Suggestions
Once your choux pastry shells are completely cool and your cream puffs with vanilla pudding filling is perfectly chilled and set, it's time for the grand finale: assembly!
Filling the Puffs: Two Easy Methods
- The Slice-and-Fill Method: This is perhaps the most common and easiest approach. Using a serrated knife, carefully slice each cooled cream puff in half horizontally. Spoon a generous amount of your vanilla pudding cream onto the bottom half of each puff. Place the top half back on, creating a delightful "sandwich." This method allows for a beautiful presentation, showcasing the creamy filling.
- The Piping Method: For a more elegant and neat finish, transfer your chilled pudding filling to a piping bag fitted with a round or star tip. If you prefer not to slice the puffs, you can gently poke a small hole in the bottom or side of each puff using the tip of a knife or a skewer. Insert the piping bag tip into the hole and squeeze gently until the puff feels adequately filled. This method works well if you plan to stack the cream puffs or want a clean exterior.
Finishing Touches and Presentation
Once filled, your cream puffs are ready for their final flourish. A simple dusting of powdered sugar is a classic and elegant touch, adding a subtle sweetness and beautiful contrast. For those who crave extra indulgence, a drizzle of melted chocolate, a chocolate ganache, or a caramel sauce can take these treats to another level. You can create artistic patterns with the drizzles, making each cream puff a mini edible masterpiece.
Serving and Storage
These cream puffs are incredibly versatile. They can be served slightly warm (if filled just before serving) or, more commonly, chilled. Serving them chilled enhances the creaminess of the vanilla pudding filling, making them incredibly refreshing. They are perfect for dessert after a family meal, a delightful addition to a party spread, or an impressive contribution to a potluck. For optimal freshness and texture, it’s best to fill the cream puffs within a few hours of serving. While the unfilled pastry shells can be stored in an airtight container at room temperature for a day or two, or even frozen for longer, once filled, the cream puffs should be stored in an airtight container in the refrigerator. They are typically best enjoyed within 1-2 days, as the pastry shells can start to soften over time due to the moisture from the filling.
Why Homemade Cream Puffs Trump Bakery-Bought
While a bakery might tempt you with its perfectly arranged pastries, there's an undeniable joy and superiority in homemade cream puffs. Firstly, there's the unparalleled freshness. That crisp shell, just baked and cooled, with its delicate crackle, is something rarely found in a pastry that's been sitting in a display case. The texture contrast between the firm, yet tender shell and the meltingly smooth, cool filling is at its peak when made fresh at home.
Secondly, making them yourself offers complete control over the ingredients. You know exactly what goes into your cream puffs with vanilla pudding filling, free from preservatives or artificial flavors often found in mass-produced items. This allows you to tailor the sweetness level, enrich the filling with extra vanilla or a splash of liqueur, or even experiment with organic ingredients.
Finally, there's the immense satisfaction and sense of accomplishment that comes with creating something so beautiful and delicious from scratch. Despite their elegant appearance, as this recipe proves, cream puffs are remarkably forgiving and achievable for home bakers of all skill levels. The "oohs" and "aahs" from your guests when they discover your homemade creation will be all the reward you need.
Conclusion
Quick cream puffs with decadent instant pudding filling are more than just a dessert; they are an invitation to indulge in a moment of culinary pleasure, made incredibly accessible. Combining the airy grace of classic choux pastry with the effortless luxury of a vanilla pudding cream, this recipe proves that extraordinary desserts don't have to be complicated. Whether you're a novice baker looking to impress or a seasoned pro seeking a reliable, crowd-pleasing treat, these cream puffs deliver on every front. So, gather your ingredients, embrace the simplicity of instant pudding, and prepare to delight your taste buds and those of your loved ones with these irresistible, homemade wonders. Enjoy the sweet rewards!
